Thats a solid idea. I actually have a few of those.tommy wrote: Wed Jul 17, 2024 9:45 amAnother great option would be using a rubber brayer as used in printmaking, for anyone with an artist in their house. Can probably also be obtained cheaply online for less than the cost of a reissue or replacement badge. But I haven’t priced one in recent years.Nate Dort wrote: Tue Jul 16, 2024 10:42 am You can have shaky hands and still do it the way I did it. I basically followed this technique:
https://thepatriotwoodworker.com/forums ... pictorial/
Re: PRF Members Tech Journal
232I had an Aria 12 string acoustic whose neck block had collapsed, buckling the top but leaving the (bolt on) neck in need of a body. Then I found an Aria 1532T on Yahoo Japan, with a Fernandes neck grafted on, and thought I'd have a shot at making a 12 string electric from the parts. Eventually had it shipped, unboxed it and didn't bother trying to reattach the Fernandes neck. Laying up the 12 string neck it was clear that it's not going to be a plug-and-go situation - here it is the correct distance from the bridge:
 but to do that the neck barely overlaps the pocket, and would collapse instantly with 12 strings up to tension:
 Conversely if I sit the neck right in the pocket, the bridge relocates to the trem plate, and it looks compact and pretty cool:
 Only problem is the fretboard overhang collides with the pickup, which I thought about moving, then realised I would never in a million years play a 12 string past the 19th fret! So I will cut the overhang by a fret and move the bound edge up:
 Then it's a matter of decking the trem, test fitting the bridge and drilling two holes in the trem plate for the bridge posts, and hopefully it'll look like a missing-link prototype.
Re: PRF Members Tech Journal
234Gibson GA20RVT "Minuteman":
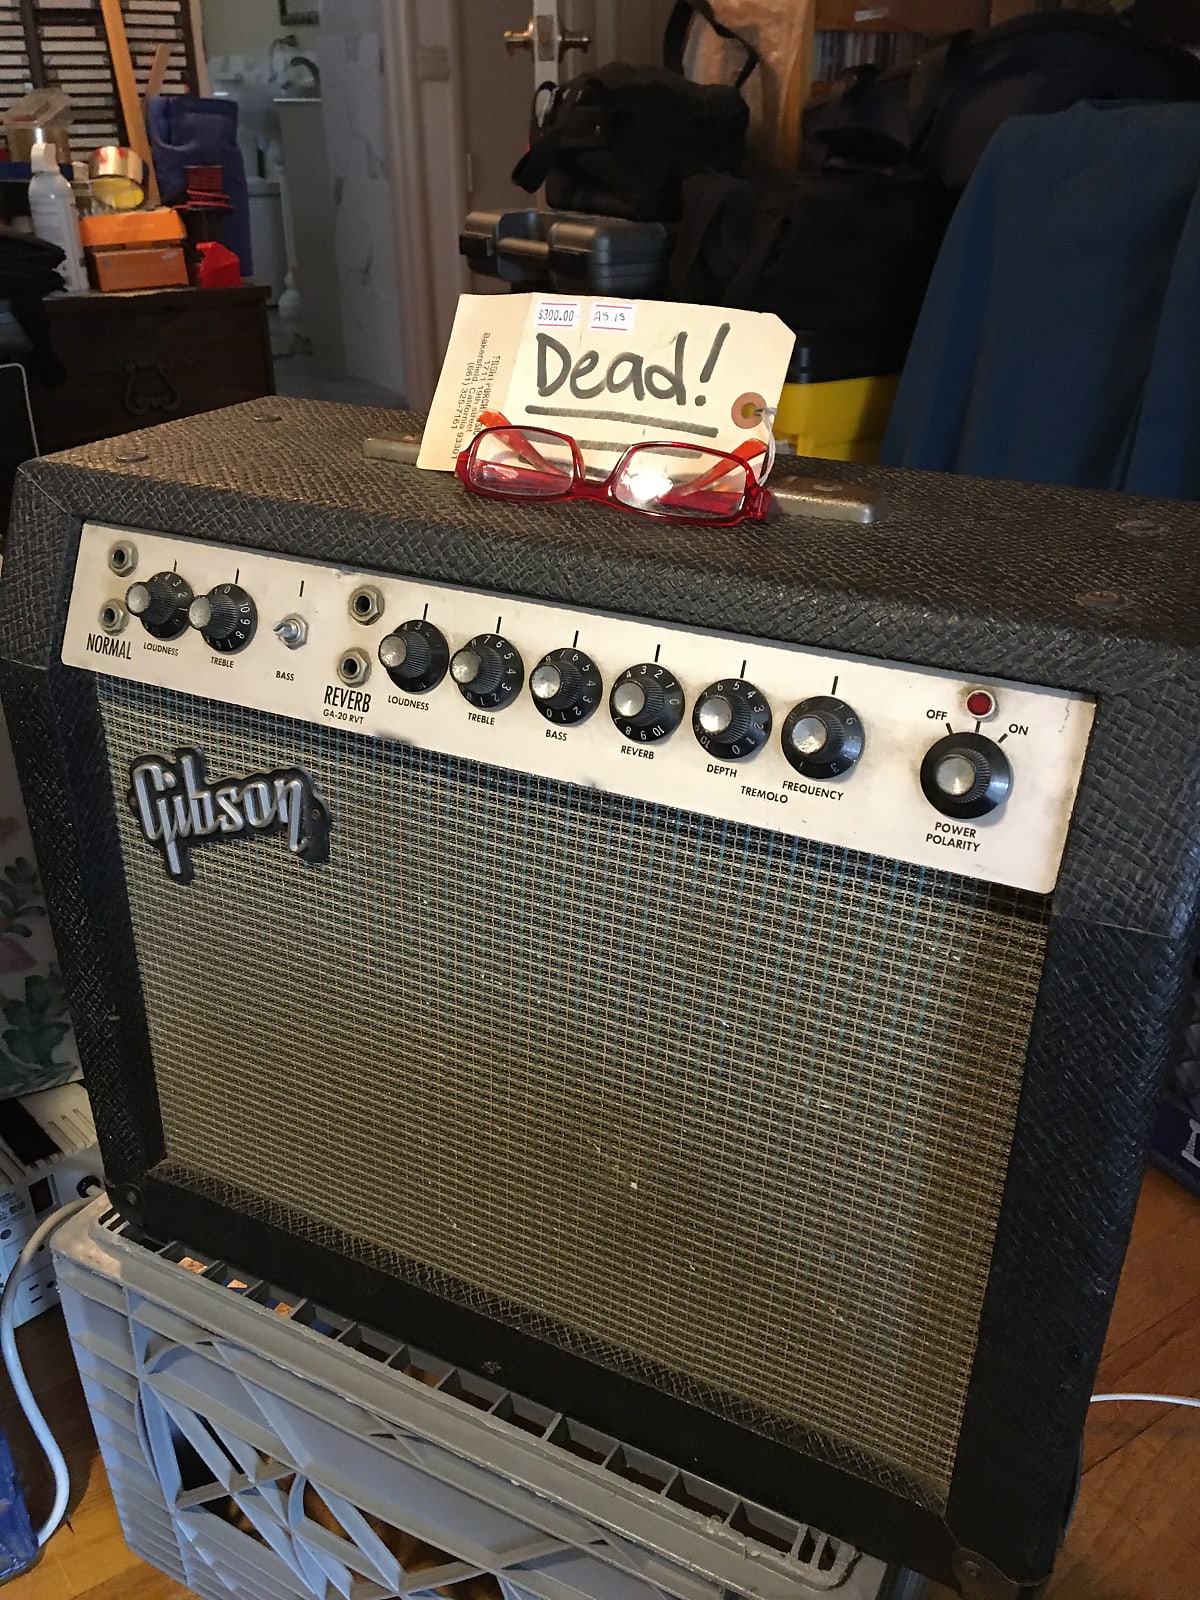
I posted about this in another thread, but I bought this on reverb, the seller never shipped it after a week and ended up refunding me, much to my chagrin. A couple weeks later they message me and asked if I still wanted it, so I bought it for the second time. It showed up a few days ago.
Filthy, speaker disconnected and had a hole and a long stress tear in the cone. Looks to be from 1966 based on some internal date codes.
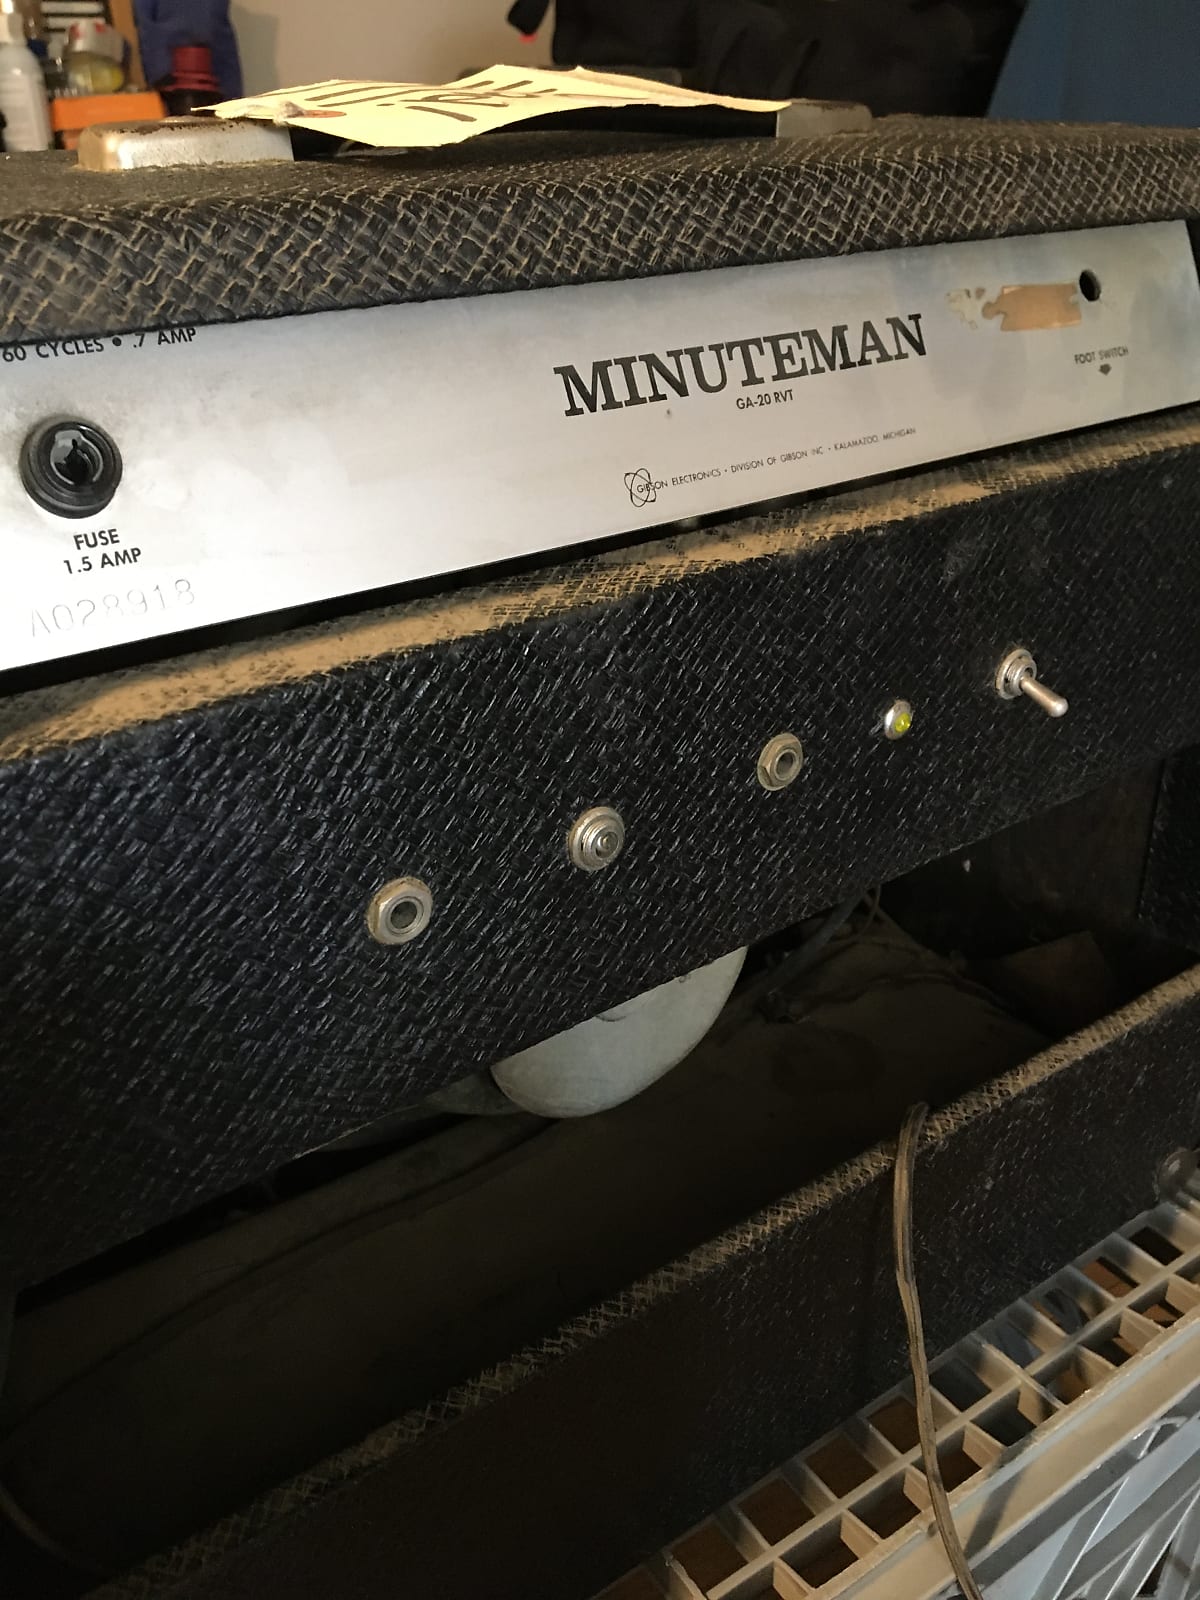
Somebody had added extra jacks on the back panel, along with a toggle switch. The toggle switch was connected to the AC power cord, so I don't know if they were trying to bypass the main power switch on the front or what.
I completely disassembled it, spent the better part of a day scrubbing and vacuuming it, and then started working on the electronics. All the tubes were there and seem to work fine. The reverb transformer had been replaced with a Stancor multi-tap plate-to-line transformer, but the secondary side winding was open between two of the taps. I was able to jump the open section, so it's not quite the right matching impedance, but it will work. I moved it from the side of the cabinet to the bottom of the metal chassis.
I removed the extra stuff from the back and plugged the holes.
Remvoed the death cap and wired a new 3-prong power cable.
Added a TRS jack to a hole that was already drilled in the back panel. Wired it in parallel with the DIN plug for the fooswitch, so now it will work with any standard 2-button footswitch.
I ran the knobs through the ultrasonic cleaner, but that was a mistake because the white numbering lifted off almost immediately. Whoops. Those Rogan 0-10 knobs aren't cheap. I threw some mini witch hat knobs I had in my stash on there.
Most of the pots were completely seized. Took a lot of cleaner and lube to get them freed. I ended up breaking the shaft on the trem frequency pot, which was a 1.5M reverse audio taper. Impossible to find. I replaced it with a 2M linear taper, which should be functional.
Repaired the tear in the speaker cone with some tissue paper and contact cement.
I replaced all the electrolytic and tantalum caps and brought it up on the variac. The speaker is super midrangey, which is a common complaint I've read about these. I ordered a cheap 60s Rola alnico to try out.
Also found that the tremolo "roach" was bad. The LDR measured open, which surprised me, because typically it's the incandescent bulb that burns out in these things. I found a guy on ebay who makes reproductions for $20. Saves me the hassle of having to roll my own.
Schematic from inside the cabinet, which appears to be an earlier version of the one that's easily found online. There's a few minor differences.


I posted about this in another thread, but I bought this on reverb, the seller never shipped it after a week and ended up refunding me, much to my chagrin. A couple weeks later they message me and asked if I still wanted it, so I bought it for the second time. It showed up a few days ago.
Filthy, speaker disconnected and had a hole and a long stress tear in the cone. Looks to be from 1966 based on some internal date codes.
Somebody had added extra jacks on the back panel, along with a toggle switch. The toggle switch was connected to the AC power cord, so I don't know if they were trying to bypass the main power switch on the front or what.
I completely disassembled it, spent the better part of a day scrubbing and vacuuming it, and then started working on the electronics. All the tubes were there and seem to work fine. The reverb transformer had been replaced with a Stancor multi-tap plate-to-line transformer, but the secondary side winding was open between two of the taps. I was able to jump the open section, so it's not quite the right matching impedance, but it will work. I moved it from the side of the cabinet to the bottom of the metal chassis.
I removed the extra stuff from the back and plugged the holes.
Remvoed the death cap and wired a new 3-prong power cable.
Added a TRS jack to a hole that was already drilled in the back panel. Wired it in parallel with the DIN plug for the fooswitch, so now it will work with any standard 2-button footswitch.
I ran the knobs through the ultrasonic cleaner, but that was a mistake because the white numbering lifted off almost immediately. Whoops. Those Rogan 0-10 knobs aren't cheap. I threw some mini witch hat knobs I had in my stash on there.
Most of the pots were completely seized. Took a lot of cleaner and lube to get them freed. I ended up breaking the shaft on the trem frequency pot, which was a 1.5M reverse audio taper. Impossible to find. I replaced it with a 2M linear taper, which should be functional.
Repaired the tear in the speaker cone with some tissue paper and contact cement.
I replaced all the electrolytic and tantalum caps and brought it up on the variac. The speaker is super midrangey, which is a common complaint I've read about these. I ordered a cheap 60s Rola alnico to try out.
Also found that the tremolo "roach" was bad. The LDR measured open, which surprised me, because typically it's the incandescent bulb that burns out in these things. I found a guy on ebay who makes reproductions for $20. Saves me the hassle of having to roll my own.
Schematic from inside the cabinet, which appears to be an earlier version of the one that's easily found online. There's a few minor differences.
Re: PRF Members Tech Journal
235I’ve got two solutions for you that I’ve used with success if the knobs have a little recession for the numbers.Nate Dort wrote: Wed Jul 24, 2024 3:25 pm I ran the knobs through the ultrasonic cleaner, but that was a mistake because the white numbering lifted off almost immediately. Whoops. Those Rogan 0-10 knobs aren't cheap. I threw some mini witch hat knobs I had in my stash on there.
1) do like old school D&D dice, color with some force over the skirt with a white or off white crayon, and then wipe off the top gentle enough to remove the wax from the skirt but leave the pigment in the channel.
2) same method but with acrylic paint mixed to the vintage faded off white tint. Paint over the surface and wipe gently before it dries, leaving the paint only in the recessed/embossed channel.
Re: PRF Members Tech Journal
236Thats some red box shit right there!
Re: PRF Members Tech Journal
237Good thoughts. I've actually done the crayon thing in the past and while there's maybe 1 or 2 of these knobs that it would work on, the rest have barely-there engravings that I can hardly see, let alone feel.tommy wrote: Thu Jul 25, 2024 11:25 amI’ve got two solutions for you that I’ve used with success if the knobs have a little recession for the numbers.Nate Dort wrote: Wed Jul 24, 2024 3:25 pm I ran the knobs through the ultrasonic cleaner, but that was a mistake because the white numbering lifted off almost immediately. Whoops. Those Rogan 0-10 knobs aren't cheap. I threw some mini witch hat knobs I had in my stash on there.
1) do like old school D&D dice, color with some force over the skirt with a white or off white crayon, and then wipe off the top gentle enough to remove the wax from the skirt but leave the pigment in the channel.
2) same method but with acrylic paint mixed to the vintage faded off white tint. Paint over the surface and wipe gently before it dries, leaving the paint only in the recessed/embossed channel.
Re: PRF Members Tech Journal
23812 string update: Decided that I'm modifying the neck while trying to keep the body original. So I tackled the heel width using a bench sander, aligned the neck with a clamp, marked and drilled guide holes:
 Fitted up with some old strings to check setup - fine, will need to raise the bridge of course, should be easy using posts out of the trem plate:
 However the nut puzzled me for a minute:
 until I realised it must have been replaced. I bet they wondered why it was never in tune. Looks like some nut adjustment to come ... probably easy given the forgiving nature of zero frets. I hope!
Re: PRF Members Tech Journal
239When I figured that the input transformers of the Altec 1678 can easily be unsoldered I decided to make my friend a brand new 8 channel mic preamp using the original input transformers, OpAmps and the power transformer. Added relay switched phantom power and -20dB pad and electronically balanced outputs.


Re: PRF Members Tech Journal
240On man, I love that. I hope to have 8 channels of the same interesting preamp one day.